Blogging with WordPress quickly becomes second-nature and there are many time-saving tips for WordPress that you can benefit from, but here are the main ones we use at WPUP.
One writes and publishes articles without giving much thought to the administrative screen and the way it’s laid out. That works, yes. But it’s a good idea to take a closer look at things if you want to be a more efficient and productive blogger. Knowing how to tweak WordPress to fit your needs can save time and effort in the long run. Start with the WordPress text editor, where the most of the blogging happens.
Time-Saving Tips for WordPress: Workspace Customization
Many people never bother to change the default settings of the WordPress text editor, even if they knew they could. But consider the time you spend navigating fields and modules you never use. Think of all the space that they take up on your screen. Why not free yourself from distraction by getting rid of them? WordPress makes it easy to do.
To configure the WordPress text editor:
- Go to Posts > Add New.
- Click the Screen Options button at the top-right of the page.
- Under Show on screen, deselect all fields (also called modules or metaboxes) that you don’t need.
- Under Screen Layout, choose the number of columns to display on the page.
- Click the Screen Options button to close it.

To give an example of when to modify these settings: If you are the only author in your blog, it makes no sense to keep the Author field visible. If you never add a featured image to your posts, disable the Featured Image module. Or if you want more space for the main text box, choose a one-column instead of a two-column layout.
You can configure the Screen Options for other areas in the WordPress administrative panel. Available options will vary depending on what page you are on. The options for the Posts page, for example, will be different from the options for the Categories page.
Time-Saving Tips for WordPress: Post Scheduling
WordPress lets you assign a future publication date for posts. This feature can be a great help for bloggers who need to publish on a schedule. Post scheduling can be a life-saver too if you need to go on vacation: just write a bunch of posts in advance, pick a date for each post, and let WordPress take care of the rest while you enjoy your holiday.
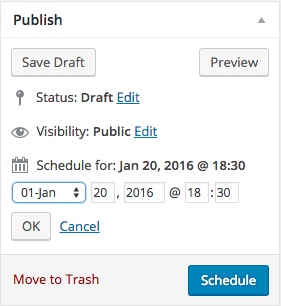 To set the date for a blog post:
- Find the Publish metabox. Usually, it is located on the right of the main text editing box. Click the arrow if it points down, to display its contents.
- Click Edit next to Publish immediately.
- Set the date and time you want the post to be published. Use the 24-hour clock format for the time. Click OK. The words “Publish immediately” should change to “Schedule for.”
- Set the Status if desired to either Draft or Pending Review.
- Set Visibility if desired. You can make the post Public, Password-protected or Private.
- Click the blue button; it should say Schedule (for public posts) or Update (for private posts).
If you change your mind about the publication date of a post, you can still go back and make changes. Follow the same steps as above.
Note: You cannot set a post to Draft and Private at the same time. If you set Visibility to Private, the Status will automatically change to Privately Published.
IMPORTANT: Users have reported missed schedules since WordPress 4.0. As of this writing (December 2015), WordPress has yet to fix the issue. See this article nosegraze.com/wordpress-missed-schedule-posting-error
Time-Saving Tips for WordPress: Keyboard Shortcuts

To format text, you can do one of two things: Either point and click at buttons on the text editor, or save time with keyboard shortcuts. Here are shortcuts to some of the most common formatting options. Some of these should be familiar to Word users. Please see the official WordPress list of keyboard shortcuts for a longer list and for equivalent Mac shortcuts.
Headings:
- ALT, SHIFT and 1 for Heading 1.
- ALT, SHIFT and 2 for Heading 2.
- (Repeat pattern for other headings.)
Lists:
- ALT, SHIFT and U to make an unordered (bulleted) list.
- ALT, SHIFT and O to make an ordered (numbered) list.
Bold, italicand underline text:
- CTRL and B for bold text
- CTRL and I for italicized text
- CTRL and U for underlined text
- CTRL and K to add a hyperlink
- CTRL and C to copy
- CTRL and P to paste
- CTRL and X to cut
- CTRL and Z to undo
- CTRL and Y to redo
Align text:
- ALT, SHIFT and J to justify text
- ALT, SHIFT and C to center text
- ALT, SHIFT and R to align text to the right
- ALT, SHIFT and L to align text to the left
Proofing text
- ALT, SHIFT and N to run spell checker (requires a plugin)
Distraction-free mode:
- ALT, SHIFT and W to switch to distraction-free mode.
- CTRL and + to widen the text box.
- CTRL and – to narrow the text box.
WordPress makes blogging so effortless that it’s easy to forget how powerful it is. But getting to know your tools is always time well spent. You’ll perform better and work will be more enjoyable in the long run. Just remember to back up all your files and data before you make any changes.
We hope you enjoyed our time-saving tips for WordPress and would love to hear what are yours. Please comment bellow with your best time-saving and productivity tips when it comes to working on your WordPress site.